

How To Animate Using Clip Studio Paint
How to paint a zombie in Clip Studio Paint
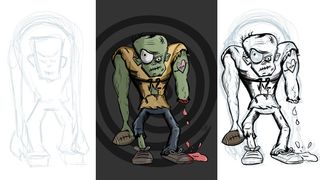
In this drawing tutorial, you'll learn how to describe and pigment a zombie using Clip Studio Paint, the digital painting app bachelor from Smith Micro Software.
- Buy Clip Studio Paint from Amazon
Although it's specifically aimed at people creating comics or manga fine art, Clip Studio Paint is corking for any kind of digital art – especially cartoon zombies!
And then grab your drawing tablet (if you don't take one already, check out our guide to the best graphics tablets to help y'all choose one) and allow's go to it.
01. Commencement with a loose sketch
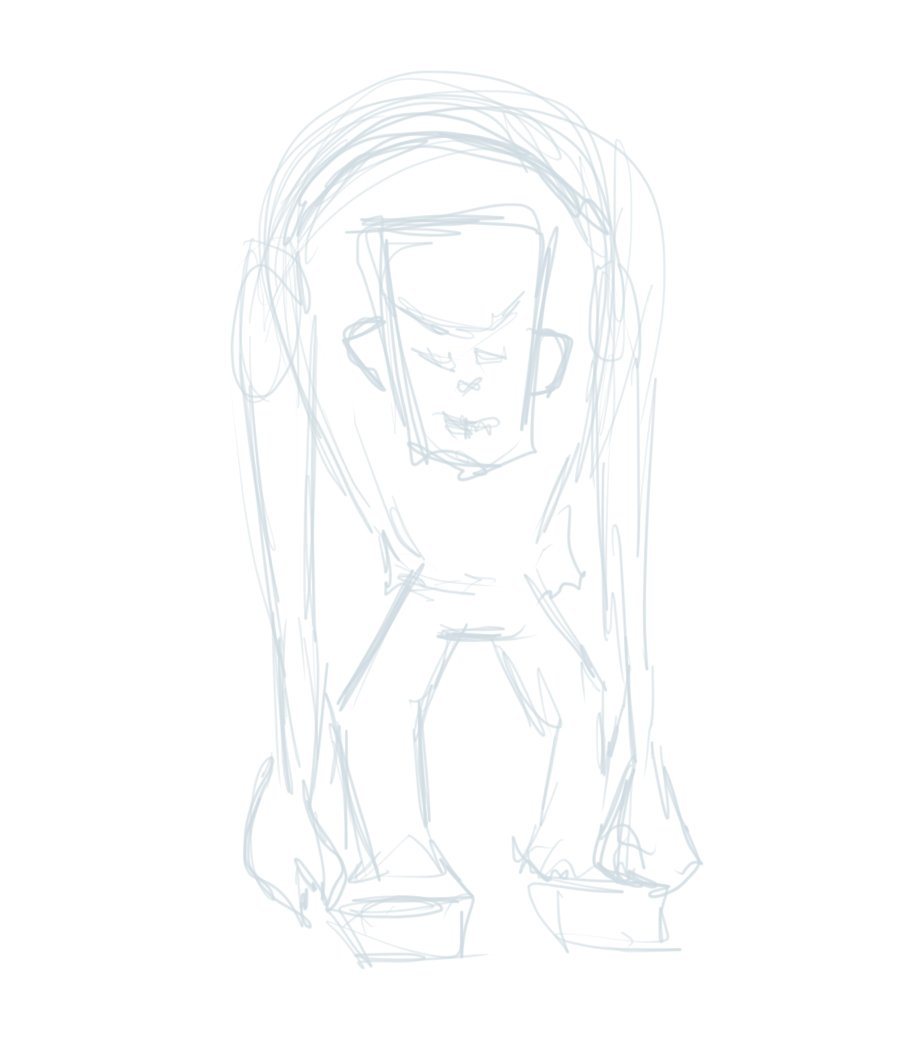
The offset stride is the initial sketch of your zombie character. When you lot're sketching, it's important to remain loose. At this phase, your goal is to get a general thought of how you desire your finished piece to look. Don't focus on the details, just cake in some simple shapes, as you'll refine this sketch in the next footstep.
Add a new vector layer (Layer > New Layer > Vector Layer...) and name it 'Sketch'. Switch to the Lighter Pencil tool and set the color to a pale blue. Of class, you tin use any color y'all similar, but my preference is to go for old school blueish. When yous're fix, outset sketching. If yous need to use a reference, that's fine. Too check out these top character pattern tips.
02. Refine the sketch
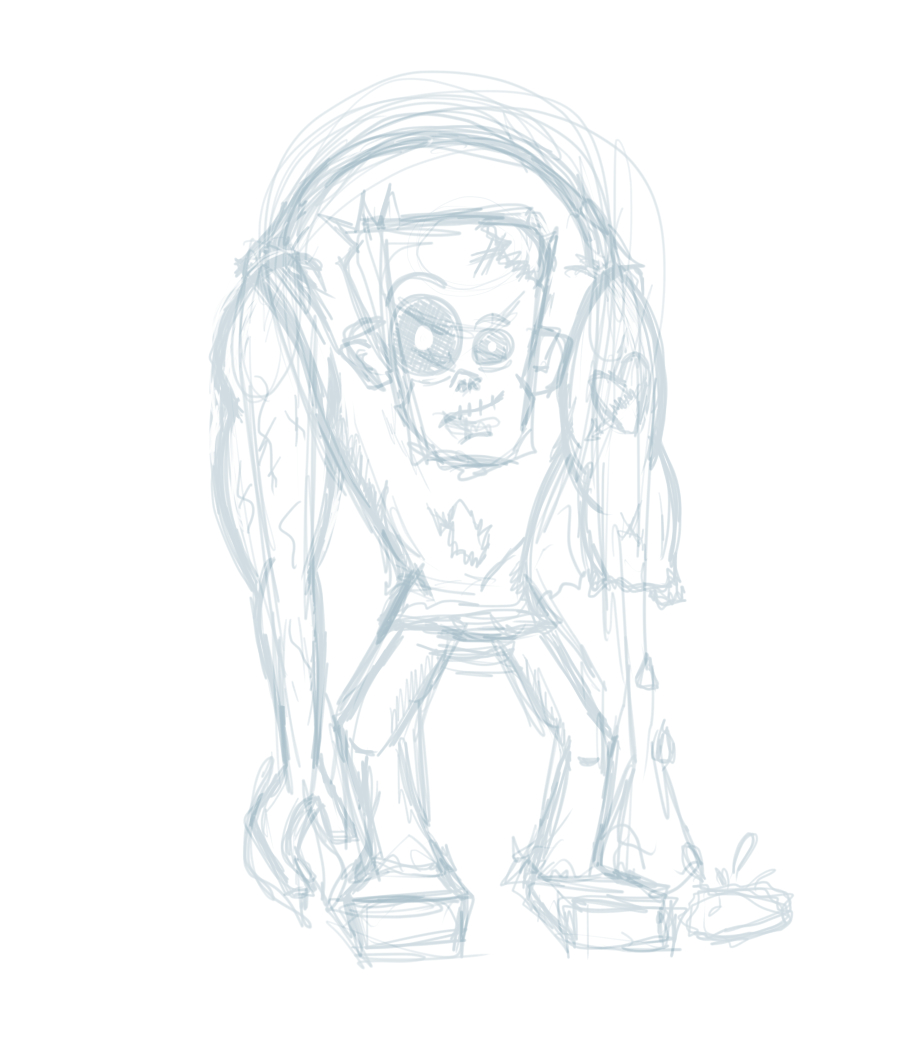
Now you lot have a full general idea of how you want your zombie to look, it's time to move on to refining your sketch. Reduce the opacity of the Sketch layer to 22%. And so, add a new vector layer and proper noun information technology 'Refined'.
Using the same Lighter Pencil tool, refine the sketch. But this time, exist more deliberate in your strokes. Perfect! You've refined your sketch. Next upward is the inking, commonly referred to every bit line art.
03. Create the linework
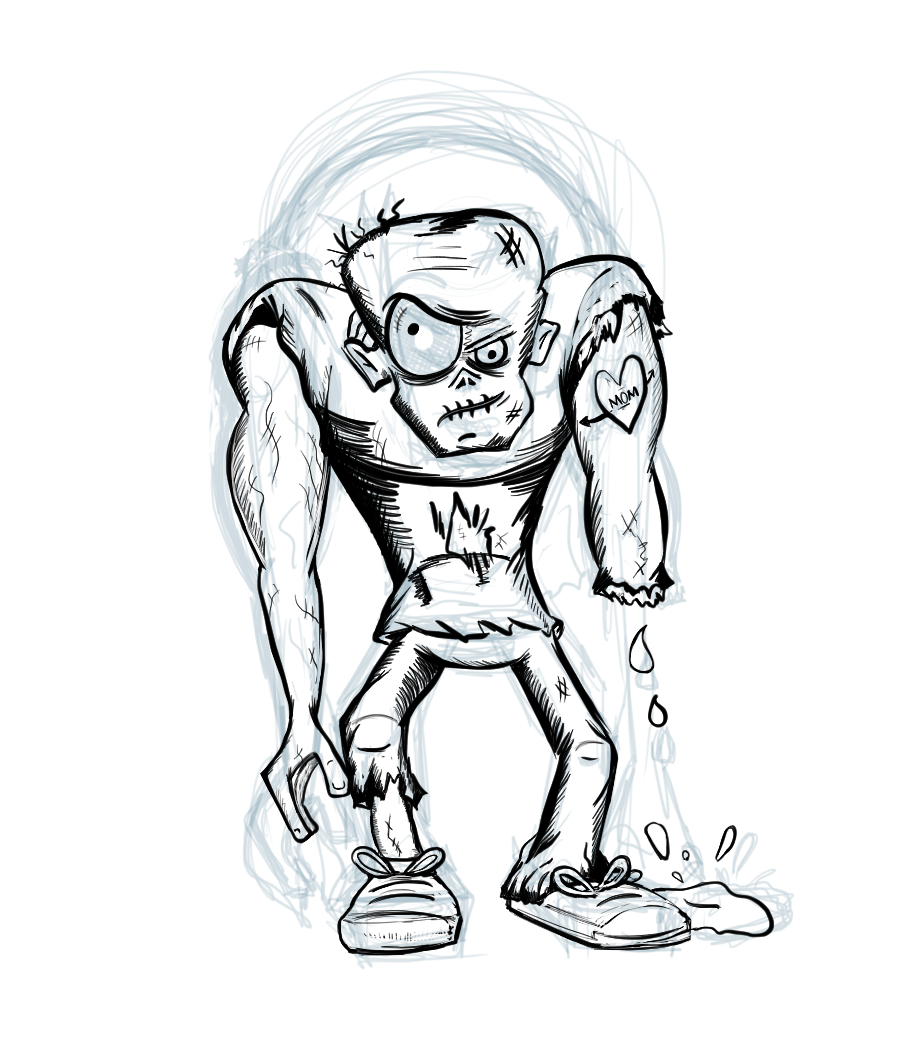
But like you did with the Sketch layer, reduce the Refined layer to 22% opacity. Then, add together a new vector layer and proper name it 'Ink'. Switch to the Mapping Pen tool and set the color to blackness. Take your time to become the linework equally clean as possible.
04. Right errors with a transparent pen
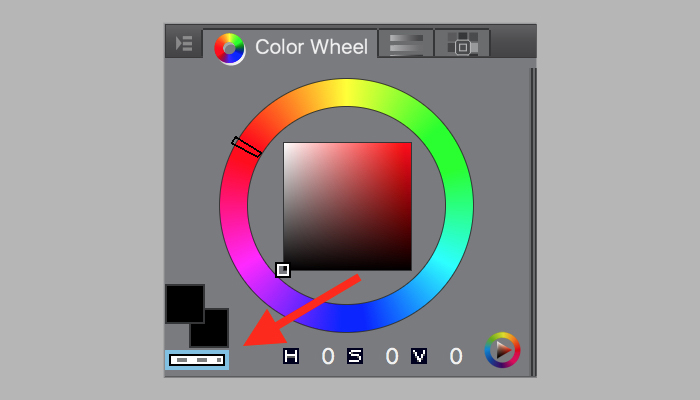
If you make a mistake, exercise non utilize the eraser tool! Instead, switch the colour of the Pen tool to transparent, then describe over the mistake. To switch to a transparent colour, select the transparent color option from the Color Wheel. Using a transparent colour lets yous erase with more than precision, plus it uses the settings from whatever tool is selected so it only tends to work better.
05. Make changes
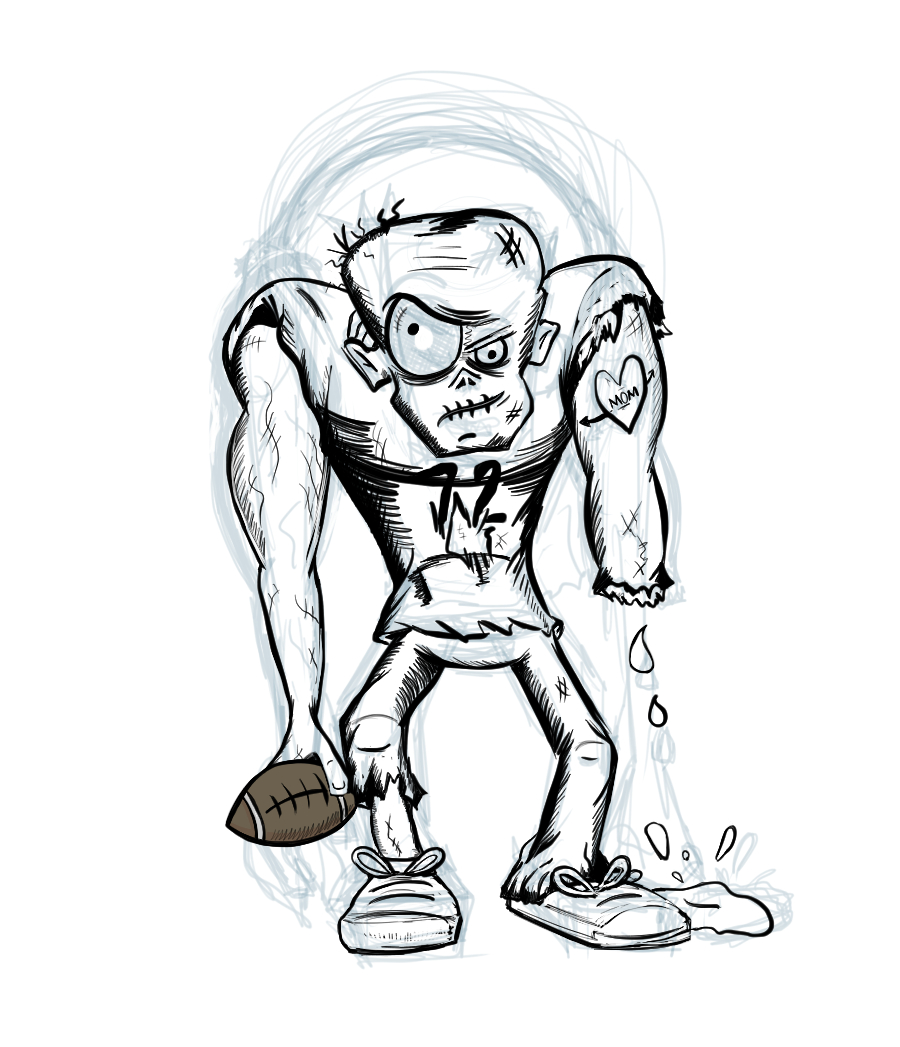
While you're inking, it's fine to change your mind. Ideally, you'll take wanted to work your design out in the refinement stage, but if something doesn't sit right with you, change it now. You can even go back later and add some props, which is exactly what I did.
In this case, I added some American football-themed props. But I didn't add together them on the same layer – I created a new vector later named 'Football game'. Then, on that layer, I added the numbers on the jersey and a football. I also opted to colour the football while I was inking it. This allowed me to cover the zombie'southward paw instead of erasing information technology.
06. Set up upwardly a mask for your color layers

I tend to employ masks on my colour layers, as information technology means I can pigment with big, broad strokes. Start by duplicating the Ink layer (Layer > Indistinguishable Layer). Rename the newly created layer 'Values' and drag information technology below the Ink layer.
Then, with the Magic Wand tool, click on the background of the newly created layer. This will select all of the white space. In that location is 1 spot that information technology won't select: the surface area in betwixt the body and the right arm. To add together that portion to the selection, hold down the alt/option key, and select the empty space.
Now, invert the option (Selection > Capsize selected area). With the selection inverted, it's time to make the mask (Layer > Layer Mask > Mask Pick). Once you have the mask in place, switch back to the principal canvas on the Values layer, and start blocking in the different values.
07. Start blocking in values in blackness and white
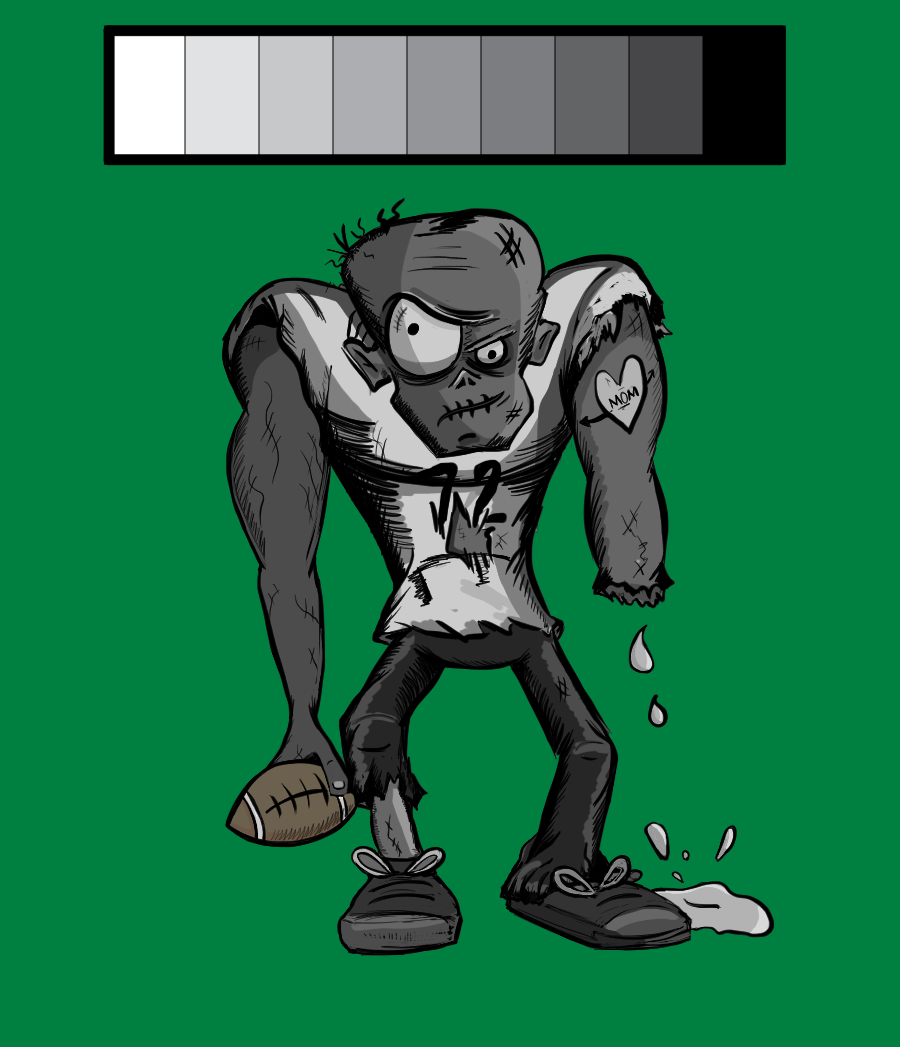
It'south time to cake in some values. While it'due south possible to get-go adding colour right abroad, it'due south generally a better arroyo to outset with black and white showtime. When you pigment in black and white, you can stay focused on things like limerick, form and lighting, rather than selecting colours. Need more convincing? Have a look at this article on how painting in black and white can amend your fine art.
When selecting values, it's important to take into account the lighting. But it'due south also important to think about variation and contrast – choose what works best, but proceed the values limited to shades of grey, and skip the upper and lower ends.
My art tends to fall within the darker values. Feel free to lighten yours up, if you'd like. As for tools, I primarily stick to the Marker Pen tool. When I block in values, I tend to change the Paper color to 'Moss'. You can do this from the Paper layer's Layer Properties panel; merely gear up the Layer Colour to Moss using the choice bike. With the values blocked in, information technology's time to move on to colour.
08. Add colour
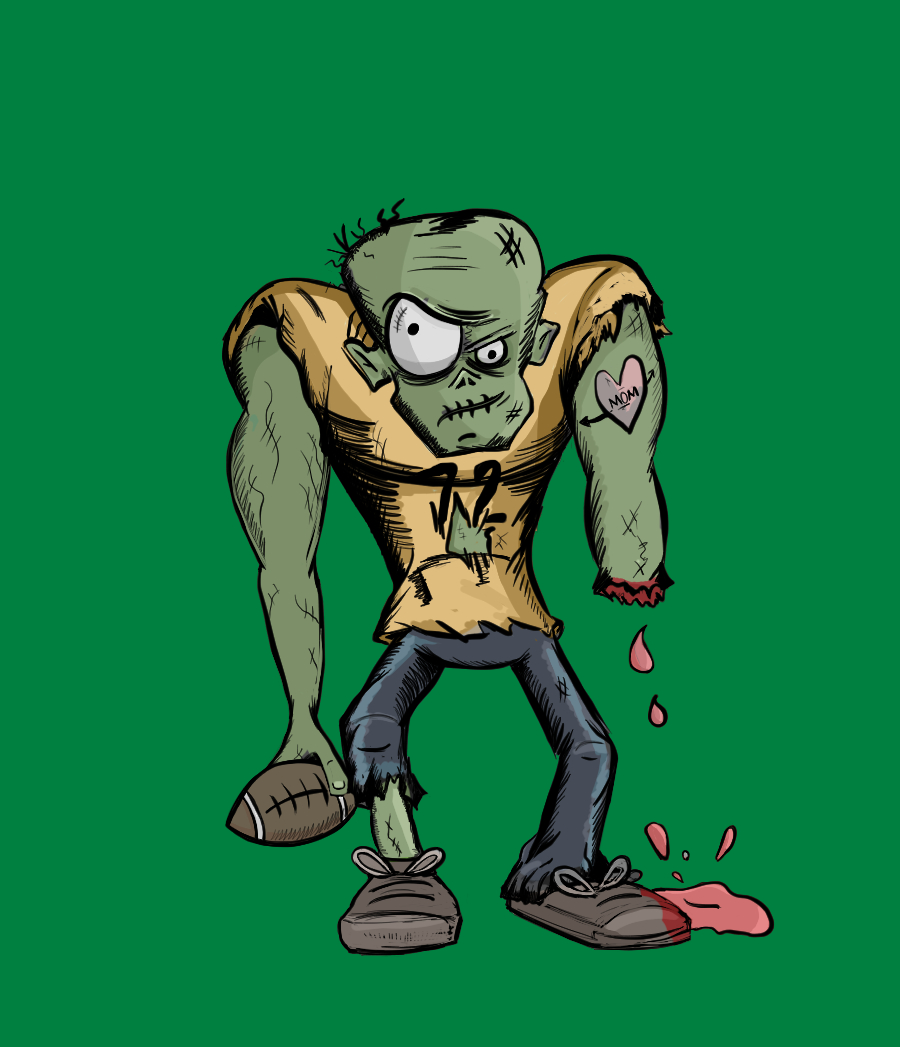
Adding color is all most setting the tone and selecting colours that work with one another. With this Quarterback Football Zombie, I opted for the complementary colours of xanthous and blue. But I didn't add them to the Values layer. Instead, I created a new layer higher up the Values layer. I also copied the mask from the Values layer to the newly created Colors layer. To copy a mask, alt/option elevate the mask from i layer to the other.
With the mask ready to get, it's time to add colour. Using the Marker Pen tool, lay down the colours of your choosing. As you exercise, notice how they pick upwardly the values from the Values layer beneath. You tin can play effectually with the Layer Properties for dissimilar effects. For this slice, I went with 100% opacity and a 'Normal' blending manner.
If you're interested in learning more than near colours, have a await at Sam Hampton-Smith'southward fantastic article on how to master colour theory.
09. Add shading and highlights
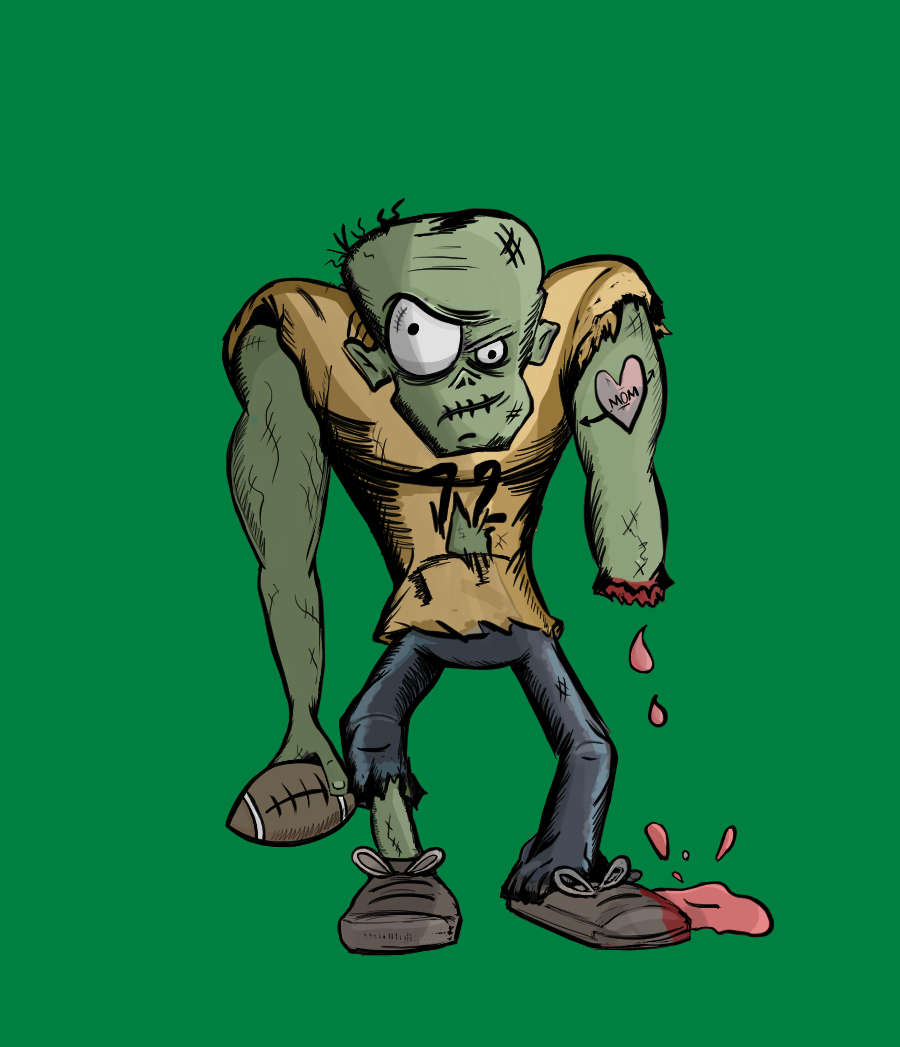
The side by side step is to add some highlights and shading. Generally, I'll create ii divide layers. For the shading layer, set the Blending mode to 'Multiply' and the opacity to twenty%. Then, paint in the shading using the Mark Pen in blackness.
For the highlights, fix the Blending mode to 'Soft Light'. Also, set its opacity to 20%. Then, paint using the Marking Pen in white. Well-nigh done! But a little left to do.
10. Add a groundwork and make finishing touches
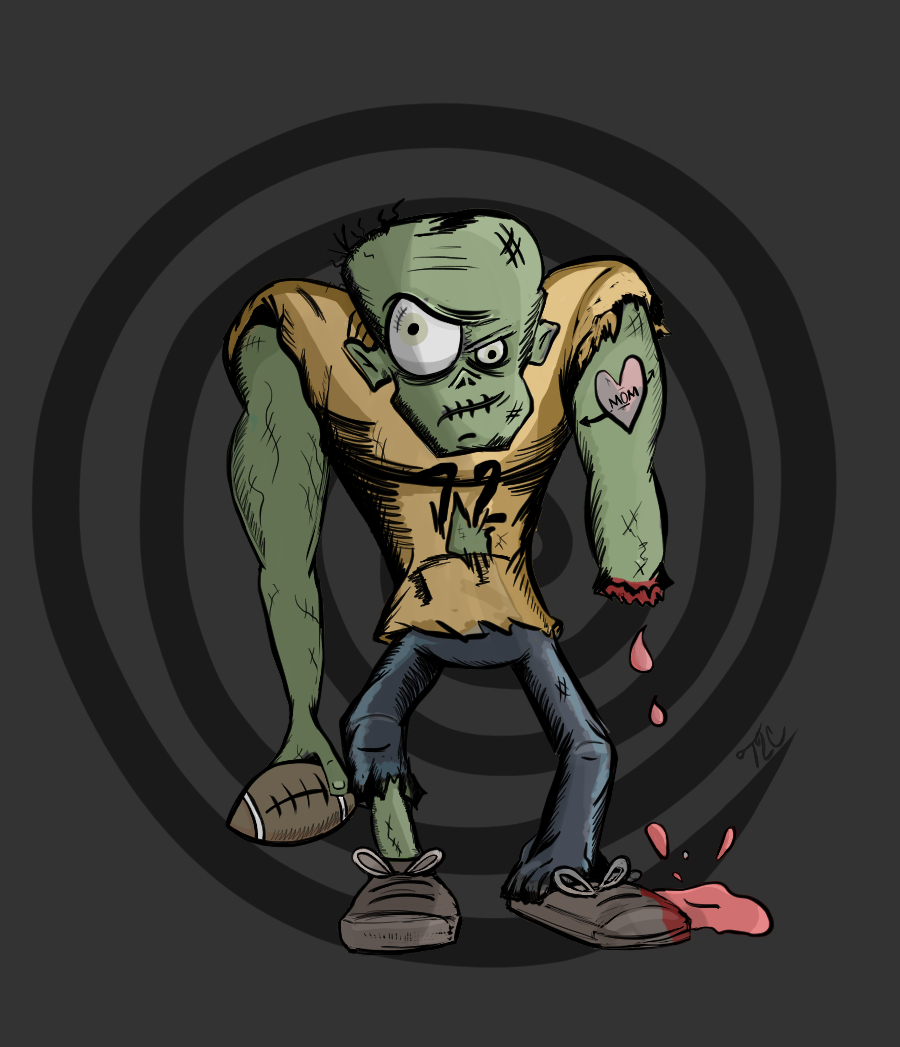
The last thing to practise is add a nice background to brand things pop. I like to add a spiral groundwork image to my characters. Create one final layer and place it beneath everything else. Rename this layer 'Background' and set the opacity to 50%. Then, with the Marking Pen tool – and a large brush size – pigment in a spiral. Also, change the paper colour to 'Tungsten'.
When you're happy with how it looks, yous're washed! Unless of course you lot're like me, and you feel the need to noodle it a chip more. My noodling involved creating some other layer higher up my Color layer, and painting in some yellowish irises on the eyes. You're ready to gear up your zombie free. Nice piece of work.
Read more:
- twenty meridian graphic symbol pattern tips
- The best graphics tablets
- Create custom brushes in Clip Studio Paint
Related manufactures
Source: https://www.creativebloq.com/how-to/paint-a-zombie-in-clip-studio-paint
Posted by: livingstoneful1977.blogspot.com
0 Response to "How To Animate Using Clip Studio Paint"
Post a Comment